Sunday, August 14, 2011

Wiring Diagram


As parts trickle in from far and near, I am losing a bit of sleep over two topics. (a) Flywheel balancing and (b) wiring. See, wiring an electric car is not like wiring a radio controlled car or even a house. It is dangerous. Done wrong, it can kill. The battery pack on the low-end will be 144VDC capable of sourcing over 1,000 Amps. Simply put, 144,000 instantaneous Watts of power can be sourced by the battery pack without trying too hard. So soldering is out the window. It could melt. Crimping is in. Heat shrink and wiring standards are in. Isolation of signal lines from power lines is a must. Booties over every possible hot connection is mandatory. Fuses and inductive kickback diodes must be strategically placed to protect the Zilla, Hairball, and Soneil charger. Presently, I have a rough idea of what the theoretical wiring diagram is supposed to look like, but practically, I have not converted that to a purchase list. 4/0 Welding cable is rather expensive per foot, so I owe this Blog a detailed electrical parts list that wastes not.

Thursday, August 11, 2011

Front 6-Battery Box Construction

There are two schools of thought on how to secure batteries in home-brew electric cars. In the first school are those who strap the batteries in using tie-downs to a base-plate. In the second school are those who build a box that contains (N-1) batteries and gravity holds them steady in the X-Y plane during braking and steering. I opted for the second school and chose to try my hand at a somewhat universally useful skill; riveting tin to aluminum corner stock. I purchased a Campbell-Hausfeld rivet gun that operates at 90-psi and connected it to my rather large DeWalt air compressor, then cranked it up to 100-psi, which seems to sheer off the pop-rivet mandrel in one handle compression. About 30% of the time two or more trigger squeezes are needed to snap off the mandrel. Sufficent to say, pop riveting a frame piece to a sheet of tin sure beats welding and gives an engineering warm fuzzy that is up there with the application of tie-wraps and heat-shrink. Step 1) was to prep the front engine compartment. I hired the little one to paint the interior of the front engine compartment completely white. Over the course of the week I aquired some sticks of aluminum corner stock and roofing tin (non-galvanized) and cut out four sticks of aluminum for the base, then drilled corner holes in the tin and riveted them. Once the four corners were rivited, I went every 3-4" and popped in a rivet for strength. With a 22" x 25" base (6-Large Optimas), it was fairly easy to bend up the edges, overlap the seams, then rivet the remainder of the battery box. The result was very strong and light and impervious to vibration and/or corrosion. Once more hardware is installed, I will fix the battery box solidly to the chassis.

Wednesday, August 3, 2011

Albright Contactor & MicroSwitches

So 80% of the EV parts are now purchased. I am in full-commit mode and am determined to get on the road more than ever. Yesterday, one part fell through the cracks. -- the Albright SW202A contactor. For the life of me I cannot figure out what the "A" stands for. So I shopped around and discovered a wide price range from $83 to $360 (luckily didn't pay $490). Why the wild price variation? The SW202-84 (known as SW202B) has me completely confused as to why it is better than the rest. The $360 option from GREV makes the most sense in terms of price because it includes the necessary Zilla microswitches to tell the Zilla Hairball the state of the contactor. Most likely SW202 "A" implies that an SW202 has these microswitches already installed. So far, Manzanita Micro does not yet seem to sell the SW202 with the microswitches installed, so I need to hunt around or install them myself. The $83 option seems to good to be true. Anyhow, here is a list of vendors.


Option "Nanfeng" seems optimal, but can it handle an upgrade to 16 x 12V batteries long-term?

For good measure, here is an EV circuit diagram made by Brian Hughes for his MR-2 EV. Thanks Brian.

Tuesday, July 26, 2011

All Karmann Ghia EV Conversions Ever Done

This list is copied from Nick Drouin's page,
  1. http://www.evalbum.com/34
  2. http://www.evalbum.com/54
  3. http://www.evalbum.com/219
  4. http://www.evalbum.com/267
  5. http://www.evalbum.com/683
  6. http://www.evalbum.com/670
  7. http://www.evalbum.com/1193
  8. http://www.evalbum.com/1412
  9. http://www.evalbum.com/1765
  10. http://www.evalbum.com/1688
  11. http://www.evalbum.com/1863
The only one missing is my car. Am I missing any?

Thursday, July 21, 2011

Battery Pack Revisited

Read this link first on the pros and cons of Exide vs. Yellow Tops. Choosing a battery pack is an exercise in balancing (pun intended) ,
  1. range
  2. acceleration
  3. life-cycle cost
  4. initial investment
Not wanting to try something new, I am looking at the following option(s),
  1. Lithium Iron Phosphate -- 44x CALB-100Ah (OUT)
  2. Thunder Sky Lithium Iron Phosphate -- 44x TS-100Ah (OUT)
  3. Optima Yellow Top -- 16x D27F
  4. Flooded Lead Acid -- 9x Trojan T-127 (OUT)
  5. AGM Marine Deep Cycle -- 12x Exide Orbital ORB34DC-36 Sealed VRLA
In terms of analysis,

Pack 1

  • $140/each = $6160
  • 100Ah Pack
Pack 2
  • 100Ah Pack
  • 7.7 lbs x 44 = 340 lbs
  • 4.0V x 44 = 176 volts Charging
  • 3.2V x 44 = 141 Volts Nominal
  • 2.8V x 44 = 123 Volts Discharge
Pack 3
  • $196/each = $2,352
  • 66 C/20 Capacity
  • 1025 CCA @ 32F
  • 12.25" x 7.00" x 8.75"
Pack 4
  • $220/each = $2,640
  • 150Ah Pack
Pack 5
  • $200/each = $2,400
  • 935 CCA
  • 100Ah Pack

And a cool little battery monitor can be found by clicking the link in this sentence.

Wednesday, July 20, 2011

Water Pump Research Zilla 1K Cooling

After surfing many websites the Swiftech MCP655 (Laing D5) stood out as the most likely best value for the money option. EVers and CPU overclockers use this pump. In conjunction with the pre-existing Air Conditioning radiator, use of the vintage fuel line, and the purchase of some new 1/2" diameter clear green tubing, we should be able to cool the Zilla 1K and any other hot component in style. [Items purchased on July 27, 2011 @ Amazon].

Tuesday, July 12, 2011

Pictures of Progress

Alright so above is Dan's drawing of all the components labeled A-H in the stack measured to the thousandth of an inch (with about 1.3"total subtracted for insets). Altogether, the uncompressed stack comes out to be 5.955". Our housing space is 5.73", so that leaves .225" to be compressed inside the clutch plate, which is very doable.


Here's Dan's drawing of the whole assembly, from motor to the transaxle clutch release.


And here's the final product, obviously uncompressed, sitting on the garage table, rotated to match the drawings:

Next, we'll write up a guide for step-by-step mounting, put it in the car, buy some batteries, and get this baby into some parades!

Tuesday, September 7, 2010

Labor Day 2010

The Ghia is now behind my house and the trunk is white as an EV's trunk should be. Six cans of white epoxy paint later and this [left] is what it looks like. In addition, the gas tank and radiator in the front trunk have been removed. I plan to paint the interior of the front trunk white as well. Lately, I find myself worried about installing the electric motor, clutch plate, pressure plate, and flywheel and getting them balanced. Does anyone have any advice/lessons learned? The clearances between the flywheel and transaxle housing are very tight and attaching the clutch diaphram plate to the flywheel looks prone to balance issues. I have decided to purchase a 13lb flywheel to improve acceleration performance and may purchase a new clutch kit with alignment tool, today, to ensure that the job is done correctly. I don't think the Ghia will be rolling in time for the Space Park Sept 23rd car show. Maybe next year. Hmm, what happened to the 2010 Santa Monica, California electric car parade?


Tuesday, October 13, 2009

Flywheel Off and Nuggets of Wisdom on Cost vs. Benefit of Pack Chargers

I find myself in Oregon again, slowly mulling over which parts to buy. Worthy of note, I REMOVED THE GLAND NUT FROM THE GHIA FLYWHEEL AND DISPOSED OF THE ENGINE! I then poslished the flywheel and bagged it for the inevitable install.

On the pack charger vein and a marathon of research, it appears that using 12 Soneil 12V 1205 chargers is a bad idea. A design change by Soneil makes that series of chargers (and perhaps more) incapable of a series connection.

There is good news however. To quote "BB", "Although I've posted about this before, I've been using 16 of theSoneil 12V 1212SR chargers in the RX-7 for many years withoutmurdering batteries!" (keyword Suck Amps)

So at least the 1212SRs work, but at higher price point of $90 -- probably the other reason behind the 1205 neuter. So for those trying to avoid balancers on each pack, it appears that the 1212 is still capable charging a series pack ladder. At 12 batteries x 5 amps, you would be pushing 60Amps into a 144V pack for 8.64KWh all night long. At 114VAC, this is roughly 6.3A continuous, which fits nicely into a 10A service socket.

Lastly, the Costco Business center carries 12V battery lugs x 5 for $6.35.

Friday, July 31, 2009

Need to Move Car Again

How the months fly by. I promised to finish the electric car before the end of the Iraq war and wouldn't you know it, the war is practically over! I have to move the car again to a new spot, so I put up fliers today and am waiting for takers. Now that I have a nice break in employment (by choice), this is my chance to push the rock forward. But will I?

Tuesday, February 24, 2009

The Car Must Be Relocated

So my gravy train parking spot on the basement level of the apartment complex was revoked. I am asked to move the car to a new spot elsewhere, so need to arrange for towing today or tomorrow. My plan is to purchase towing straps at Home Depot and drag the car from Location Alpha to Location Bravo, then drag the car to the more permanent Location Charlie in a few days, lest it end up in expensive location Delta, the impound lot.

Saturday, February 21, 2009

Original Ghia Wiring Diagram Discovered


You will inevitably need to study the original 1971-72 Karmann Ghia wiring diagram. So here it is. You will then need to reconcile this with the new EV wiring diagram without inducing potentially dangerous problems related to 144V DC operations.


Friday, February 20, 2009

Red Adaptor Plate Kit Discovered in Canada (Thank You Nick)

I attended the 2009 Santa Monica EV Parade organized by "Plug In America." This event inspired further expenditures on the EV project.

With much excitement, I stumbled upon Nick Drouin's similar EV project out there in Montreal Canada. His cobalt blue 1972 Ghia conversion features the same motor as I had planned to use, which makes me feel much better. This discovery prompted me to hurry to Home Depot and purchase a crescent wrench to attempt to remove the 36mm "Gland Nut" that holds the flywheel to the gas engine. Had I read Nick's blog more carefully,

"...Ha! We spent the next hour and a half trying to get the gland-nut off the clutch / camshaft. After numerous futile attempts and one bent wrench, we stopped for lunch and to collect our thoughts. After lunch, Richard pulled out the welding machine and welded a 5 foot long 3"x1/4" metal bar to the 36mm socket we'd been using. It was out 5 minutes later...."
I would have realized that my attempt was futile. The Ghia Gland-Nut is torqued at ~254 ft-lbs and at least a 4' bar with a 36mm socket (and flywheel lock) are required to remove it. I've ordered the flywheel lock and 36mm socket.

Thanks to Nick's detailed postings, I happened upon a Canadian supplier of 1972 Karmann Ghia adaptor kits named "CanEV". Rick Holmquist at CanEV quoted $825+45 for the adaptor kit, which I ordered on 9/2/24. CanEV's adaptors are cherry red and will match the red Ghia and red Warp 9" motor, which should make a splash at the 2010 EV parade in Santa Monica. Speaking of the Warp 9" motor, here is another look at the specs,

9.25" x 15.93 Body
72-144VDC
190A Continuous
1.25" x 5 Keyed
0.75" x
1.75" Keyed
32.3HP Continuous
156 lbs

Note of caution: I will need to remove the rear apron of the Ghia before attempting to install the electric motor. The clearance is insufficient with the bumper attached. In addition, it is time to begin work on an update from the 1972 to the 2009 electrical diagram. For reference, Nick's detailed online electrical diagram.


I even got a good lead on a VW shop named "Jims" near Cherry and Del Amo Blvd in Torrance, CA that can do the coil over shocks install work.

Friday, March 21, 2008

Easter Weekend Update

I did a YouTube video search and found Doug Teeple's video of his Ghia conversion. Also, I received an email from the Zilla queue stating that it would be 6-9 months before my 1K is complete. That puts me at 9/08 -12/08, which is too late to finish a summer 2008 conversion. I emailed Electro-Automotive and requested a quote for the adaptor plate as well.

I watched the movie, "Who Killed The Electric Car." The EV community should focus their energy on exposing and humiliating the members of those who sat on that board, to set an example to future boards. I find it not useful to blame GM for acting in their own best interest. Capitalism is no inherently ethical. Cheap energy in the form of oil, natural gas, and coal do make the EV a fish out of water. As such, we EV'ers need to act like fish out of water and secretly develop technology that lets us compete in the same pond as the highly evolved ICE sharks.

Saturday, March 8, 2008

Waiting for Zilla

I put a Zilla 1K (-P -S) on back-order today. Now I am committed. I could spend my money a very cool RC boat like this and head to Legg Lake in Alhambra and Malibu to paraglide, but I decided to take the plunge.

Cloud EV has a 144V/Warp-9" kit for a cool [overpriced] $4,099.00, not including the adaptor kit (see previous post), charger, or meter.

Optimal Gia Kit:
---------------------------------------------->
1x Warp 9" Motor $1700
1x Adaptor Kit $850 (sl0w/experienced) or EV-Blue (unknown/new)
1x Zilla 1K -P -S for $1,975 more info on Z1K
1x Hall-Effect Throttle $108 (works w -S hairball option)
1x 2171S Speed Sensor Kit $45 (feeds back to Zilla hairball)
1x PakTrakr 600 $150 (need another 6-battery remote $75 )
12 x Soneil 1205SR $59.75 with more info or contact mfgr directly
12 x 12V Deep Cycle Marine Batteries from Costco or local Excide Mfgr
1x SW202-A $362 (enables reverse w/o shifting w -P hairball option)
1x A30QS500-4 Ferraz Shawmut Fuse $57
1x Manual Cutoff Switch
1x 20' of Red and Black 4/0 Welding Cable (need cheaper vendor)
1x 24 Battery Terminals (need cheaper vendor)
1x 12 4/0 Magna Lugs (need cheaper vendor)

Friday, September 7, 2007

ICE vs. EV

I had a bad night and started looking for a 1600cc long-block engine for the Ghia. It's so hard to justify the additional cost and reduced capability of an EV. Stubbornly, I fired off a few more emails to the EV community and they immediately brought me back to my senses, a.k.a., delusional obcession. Roy LeMeur (NEDRA Northwest Regional Director) replied within minutes recommended two sources for Ghia motor/transaxle adaptors. He is working on the primary EV (vice secondary EV) that inspired my project.

1) Wayne at EV-Blue (316-283-7250) (new adaptor source)
2) ElectroAutomotive (Doug's source for motor & adaptor)
3) EV-Parts (too expensive)

Within minutes, Doug Teeple of Kamuela Hawaii, also with a 1972 Ghia, replied and said that he runs his Ghia in 2nd gear and that it is more quiet in 3rd gear. He runs with a flywheel and clutch, but recommends that one balance the flywheel using the starter motor, just prior to mounting the engine. Doug uses deep cycle marine batteries from Costco (liberal return policy & 3yr warranty) @ 120V. Roy uses a batch of surplus NiCads (possibly Saft) @ 240V.

If I were to buy the parts for an EV today, I would use Optima Yellow Tops from Costco, a Zilla 1K, Warp 9, and Manzanita Charger.

Monday, March 19, 2007

N-Phase Controller with Thermal Protect

After pondering controller designs sufficiently newfangled to capture my attention for the next few months, I came up with a quick MATLAB simulation of a 40-phase PWM controller. Each phase corresponds to an IGBT capable of switching ~500W at 18KHz and up to 192V. The output of each PWM driver is tied to a thermocouple glued to each IGBT. If the temperature on a given IGBT exceeds a temperture threshold, then the output of the PWM is forced low until the temperature falls below a lower threshold. Thermal hysteresis is, therefore, built in. The MATLAB model currently assumes that each device sources 40Amps at 144Volts near the thermal shutdown region for 30% of the IGBTs. Two plots are shown. The upper plot is Time vs. total controller Amperage, while the lower plot is Time vs. PWM channel. Black indicates OFF and white indicates ON. Notice how some PWMs drivers shut off prematurely, due to thermal overload of their respective IGBTs. The net effect of a controller pushed to it's thermal limit is the somewhat ragged total Amperage plot. When all IGBTs are working within limits the total output current of the controller is nearly smooth, so V = L x (dI/dt) is significantly lower than that of a 1-Phase PWM controller. I need the help of EV veterans to tell me what impact this has on the specifications for the Flyback Diode(s) and Capacitor bank.

Sunday, March 18, 2007

St Patrick's Day Research

The EV is never far from my mind nor from the thoughts of others. Recently, I started leaning more toward buying the controller, instead of dabbling in my own design. You see, there is a California tax credit (IRS Form 8910 and 8834) that definately provide an EV deduction for 2006 and will hopefully continue into 2007 and beyond. If I keep working on my own controller and fail to complete it by the end of 07, then I run the risk of wasting money on my own design when I could have purchased Otmar's Zilla outright. Alas, I now have tunnel vision on a 40-phase IGBT controller. I just can't shake the idea of building it or cooling it. Ponder a controller consisting of N x 555 PWM drivers, one for each IGBT. Each 555 is dT = (1/(N-1))*(1/18,000) seconds out of phase with the previous 555 PWM driver. Each PWM driver is further inhibited by a single thermocouple that zeroes the output if the IGBT temperature exceeds a threshold. See this circuit.

On the subject of cooling, thanks again to the EV Forum for offering up great ideas. After much discussion, it sounds like Flourinert, Mineral Oil, Distilled Water are the top three heat transfer liquids.

On the topic of adaptors, I received a great deal of advice from Cliff Wiley, who converted a Ghia using a Prestolite MTC-4001. Jim Schinnerer send the link ($650) and this for adaptor sources. Jim also recommends that one "spend more on batteries and less on the motor." Electro Automotive in Northern California has a long history of supplying EV parts and has several links to adaptors and their prices ($750). It is not entirely clear to me why (or if) the Electro Automotive adaptor is worth $100 more than the EVparts adaptor.

On the topic of batteries, dhavranek sent me a link to his EV at http://home.comcast.net/~dhavranek/, which looks great. He used 8V T890s and recommends against it, due to their volume. I am still looking for an alternative to Optima Yellow tops. NiCad? NiMH?

On the topic of motors, Jim Husted of Killacycle fame send me a link related to his excellent work. I am a big fan of Jay Donnaway's Ghia conversion, which contains Jim's Gamera 9. Jim is not too far from Prineville, Oregon, so I hope he can help with a refurb by July 4, 2007.

Wednesday, January 31, 2007

The Christmas Controller

Over Christmas 2006 in Prineville, I put together a 1/4 scale IGBT-PWM controller using ten, 450W IGBTs. I aquired a chunk of stock Aluminum at the local metal shop, with a special thanks to Bill for letting me walk out the side door with $60 bucks worth of cold metal. Check out the camera phone picture of it on the right. It is essentially a Curtis 1505 PWM scooter controller, momentary "doorbell" switch, a 5K pot for speed control, and 3 x 10 Ohm resistors, which drop the PWM voltage by 2/3. The Curtis 1505 only works above 18V, so I plan on driving it at 24V with a gate drive voltage of 16V. The Thevinin equivalent voltage divider circuit puts 5.3 Ohms of resistance in series with 10 Ohm gate resistors. The power +V is common with the heatsink, so it "hops" to peak voltage (~140V) at the 18KHz PWM frequency. I plan on enclosing the entire heatsink it a clear Lexan tube and forcing air through it for cooling and safety.

Sunday, January 7, 2007

Stable Paralleling of IGBTs

Based upon this discussion related to current balancing of paralleled IGBTs, there are a few different options.

1. Use Field-stop IGBTs, which naturally balance current.

2. Use NPN IGBTs, which start to balance at higher temps and consider actively controlling the PWM duty cycle to prevent current hogging.

3. Use Punch-thru IGBTs, which are unstable at all temperatures, but actively control the PWM duty cycle to prevent current hogging.

In each case, make sure they share the same gate driver, have the same gate resistors, and reduce wiring lengths.

Here is an interesting flyback diode.

Saturday, January 6, 2007

MetroWerks CodeWarrior IDE


The IGBT thermal and temp. sensor board is a Motorola 56F8300DEMO microcontroller kit that I purchased for $70 from the FreeScale website. It came highly recommended and for 60MIPS and 8CH ADC at 1.66Msps, its hard to beat. Click on the picture for a better look at the development environment. Over Christmas, I built an experimental version of the motor driver with 8 IGBTs and a 64-channel analog multiplexer for individual temp sensing on each IGBT and battery. More to follow...

Here's a link to the demo kit.

Tuesday, December 19, 2006

IGBT Module Controller

Here's a sweet homebrew controller, http://www.jstraubel.com/944EV/EVproject.htm

Sunday, November 19, 2006

The HFA25TB60 Diode looks promising as a flyback diode.

This white paper outlines strategies for paralleling IGBTs with current stability.

Thursday, October 19, 2006

Batteries

It's down to Trojans 105s or Optima Yellow Tops. I want 144V+ and see the Optimas more freqently used in the Ghia, so Yellow Tops win. See links to "Who Killed the Electric Car" and "John Bryan's 1971 VW below,

http://www.austinev.org/evalbum/34

http://www.youtube.com/watch?v=MSBykAngDpY

I can't imagine a better looking Ghia than this, except I'll build my own controller for fun and use the color matched red WARP-9 motor.

Sunday, August 27, 2006

1972 Karmann Ghia EV Conversion Project


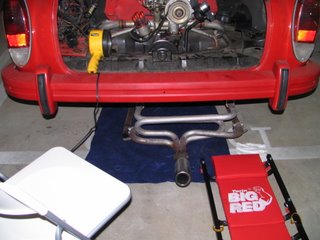
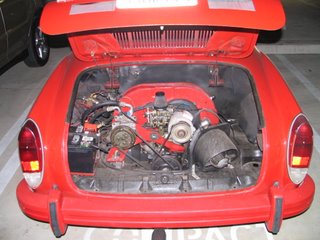
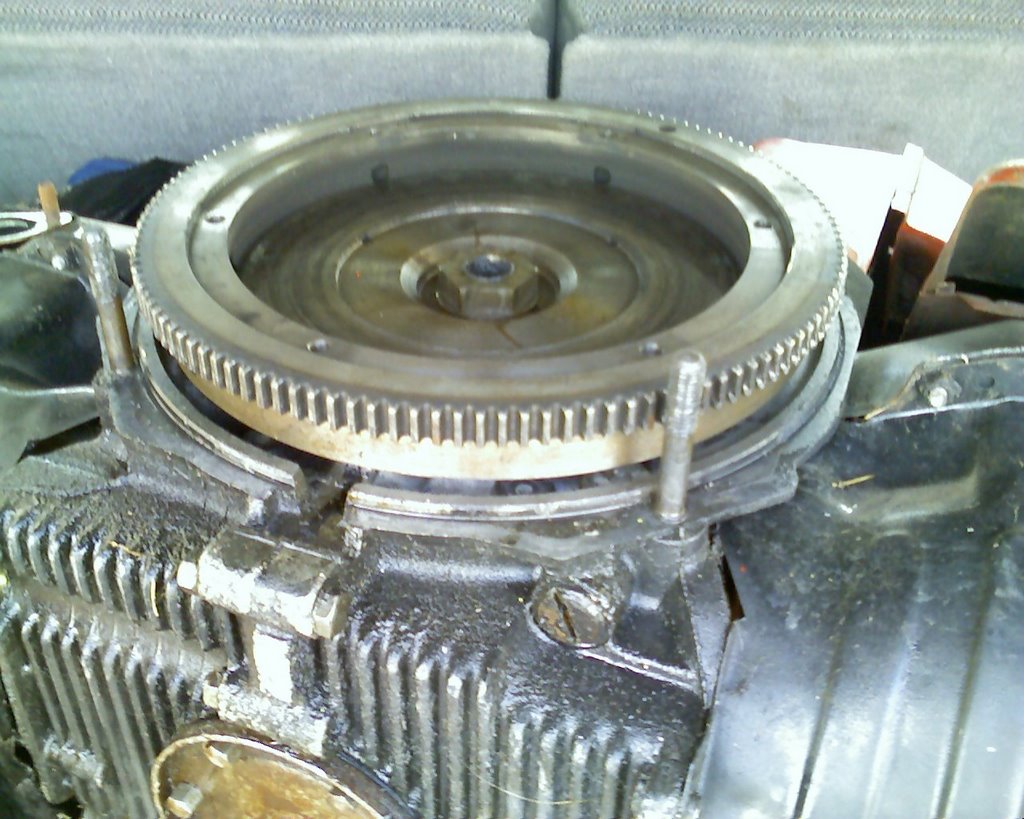
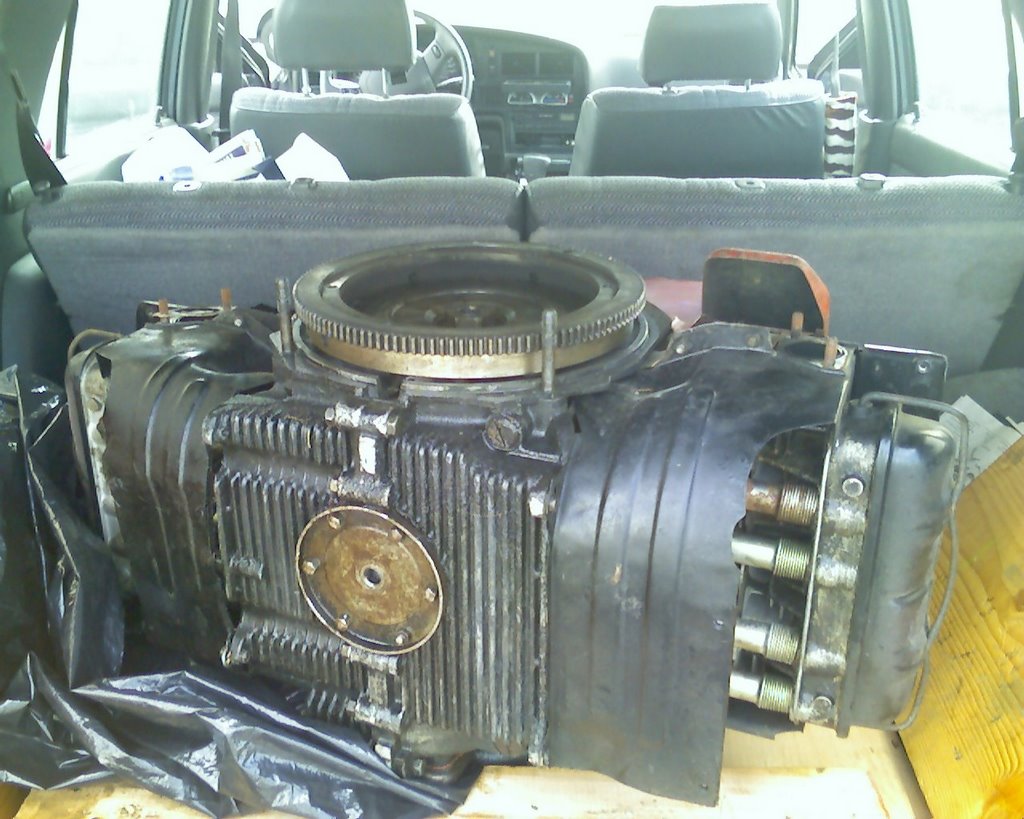
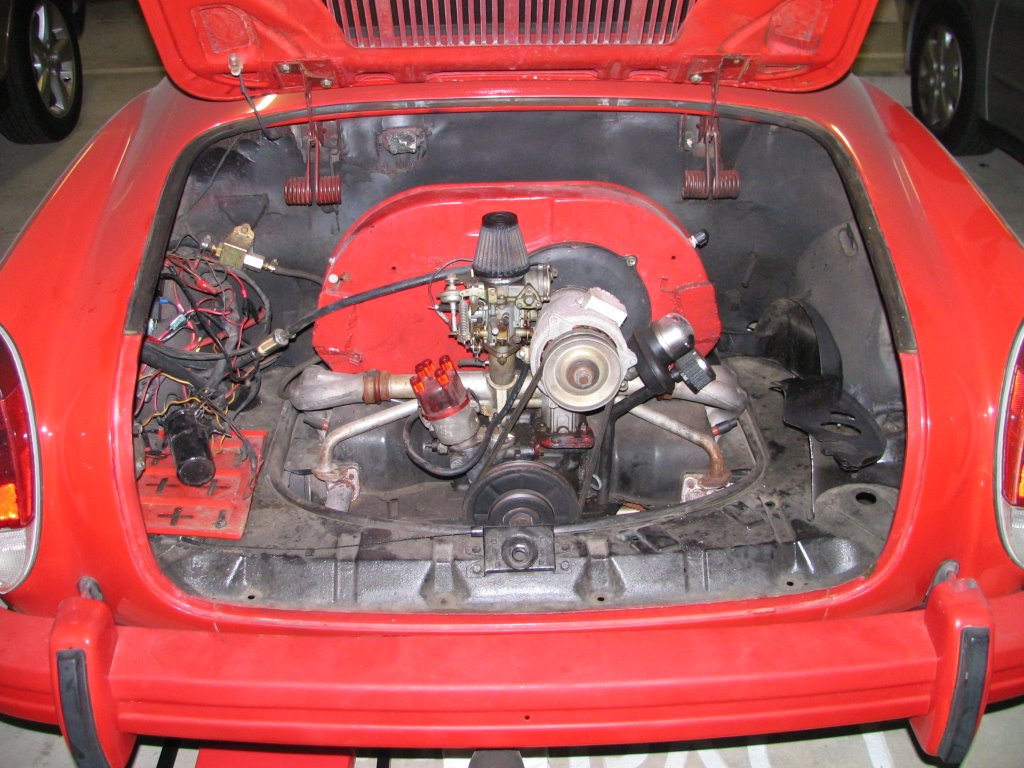
[Oct 09, 2006] So I removed the engine two nights ago. It took me all of September to work up the nerve to toss the ICE and read the Hanes Manual. I went to Poland to become a Godfather in the interim and lost my camera, so these pics are from my Razr 1Mp camara cell phone. It took me 6 months to figure out that I could send pics from my phone to my email address. The Razr phone is good for nothing slow, but makes up for it with great pics. Just to prove that the engine is gone, here are some pics of it in the back of my 1995 4Runner. Oh yeah, the entire engine removal job took 2.5 hours with the help of my good buddy George Choung. Now how do I get the flywheel off and get rid of the stinky piece of crap? My commute to work in the mornings is with the windows down to avoid passing out from the oil and gas fumes.

[Aug 28, 2006] I figured out how to open the front trunk after two-days of research. After a 3-mile run today, I popped the hood and removed several aluminum plates. I feel bad removing the air conditioner installed laboriously by the previous owner. But there is not enough real estate in the front compartment to house it and batteries too.
I was surprised to find a small radiator up front! Ghias are air cooled and I need a radiator to cool the 100KW speed controller. Technically, I could use the air conditioner to chill the speed control... hmmm... I could be onto something.

[Aug 25,2006]
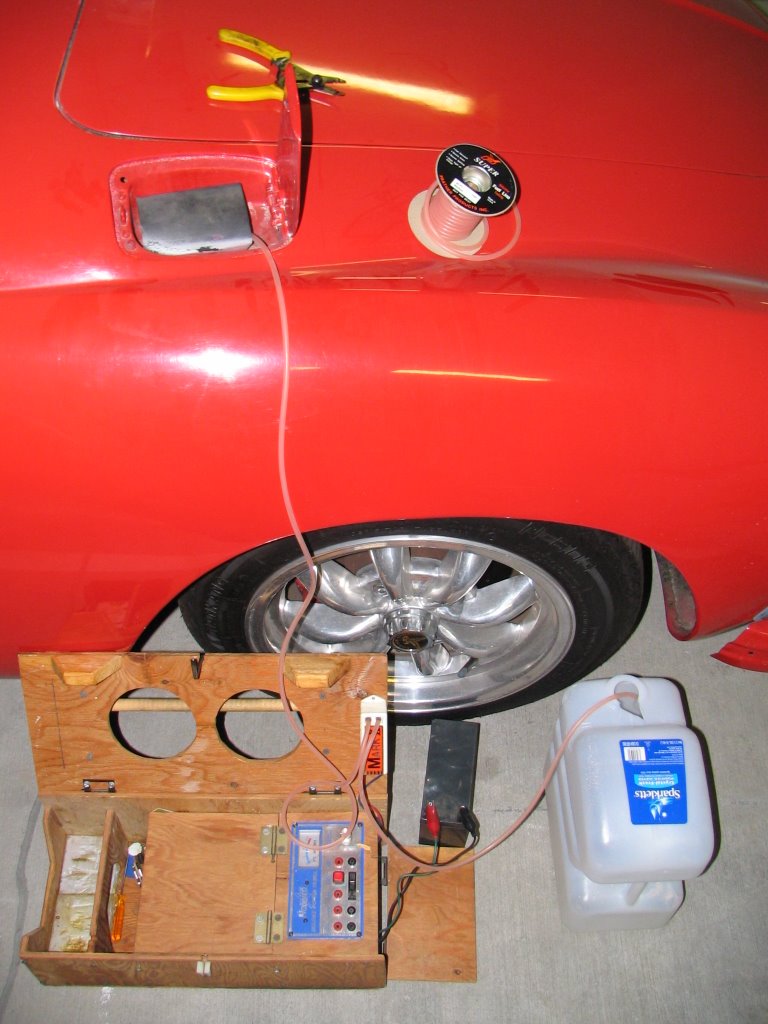
Baby steps. Late last night I used my old radio controlled airplane fuel pump and a small 12V lead acid battery to remove the remaining ~3.0 gallons of gas from the Ghia. The pump broke at ~2.0 gallons, so I used the onboard fuel pump to extract the remaining fuel several days later. Gas fumes in confined spaces are extremely dangerous, so I took the cap off of the gas tank to let it evaporate over the coming weeks. Oh yes, I removed the engine oil two weeks ago. Time is a handy tool. It is draining the remaining oil drip-by-drip from the engine onto a Sunday Los Angeles times. I've changed the diapers twice and it is still dripping. I am in no hurry.

[Aug 22, 2006]
I am committed to being cheap, so I bought a $10 12V light that I plug into my Toyota 4-Runner via an extension cable that I soldered. On sale at PepBoys was a $30 set of red jacks, red roller board, and red hydraulic jack. Late one night I removed the muffler. Sad to see it go, but this car won't need it in electic heaven.

[Aug 20, 2006]
The engine is slowly disappearing. To avoid the HOA police, I sneak down to the garage late at night and remove a part here and there.

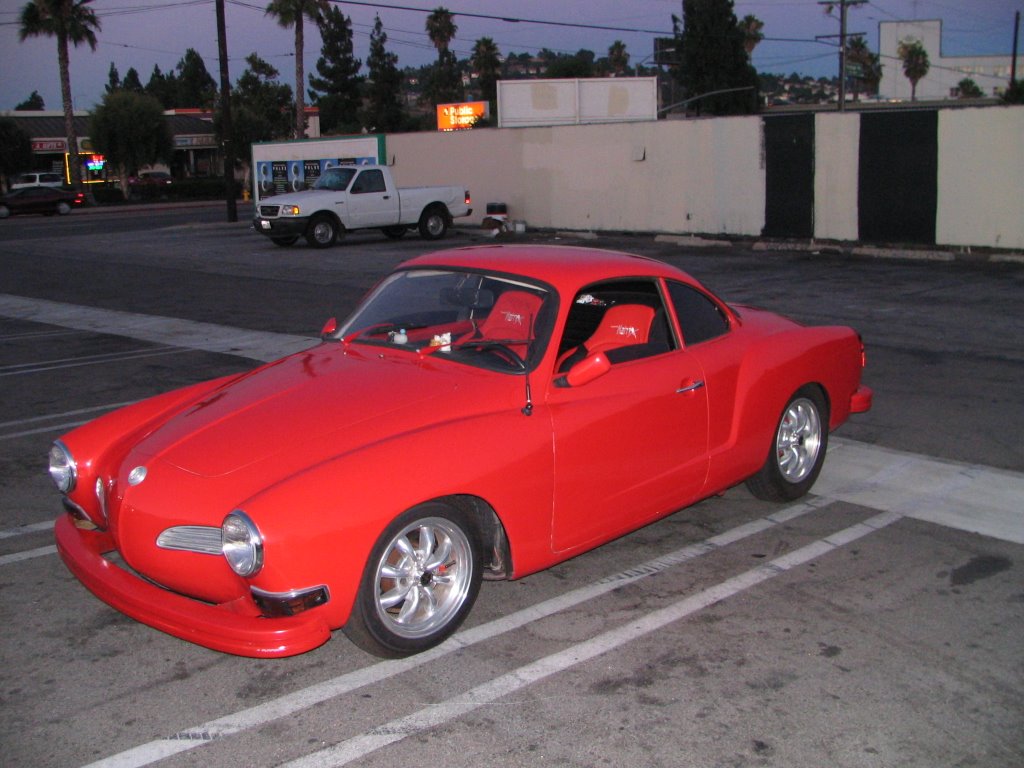
Have you ever wondered if electic cars are practical with today's technology at a reasonable cost? I decided to find out for myself by purchasing a 1972 Volkswagon Karmann Ghia and converting it to an electric commuter vehicle. I bought it for $1,950 on Craig's List Los Angeles, plus a $100 tow from Glendale to Marina Del Rey. Not too shabby!


[Day of Purchase: Aug 2, 2006]

My self imposed constraints are,

1) No timeline for completion, just like the war in Iraq
2) $2000 total cost for a used car
3) $5000 total cost for the conversion, not including labor
4) 50 mile commuter vehicle range
-- mostly flat commute
-- 60+ miles per hour for 20 minutes
5) 10-hour recharge
6) Do not get caught doing conversion in condo parking garage (car maintenance is prohibited!)
7) The car shall not leave the parking garage, unless by electric power
8) Attempt to construct a home-built 18KHz PWM IGBT speed controller
9) Keep It Simple Stupid (KISS)
10) Maintain the tenuous support of my lovely higher headquarters


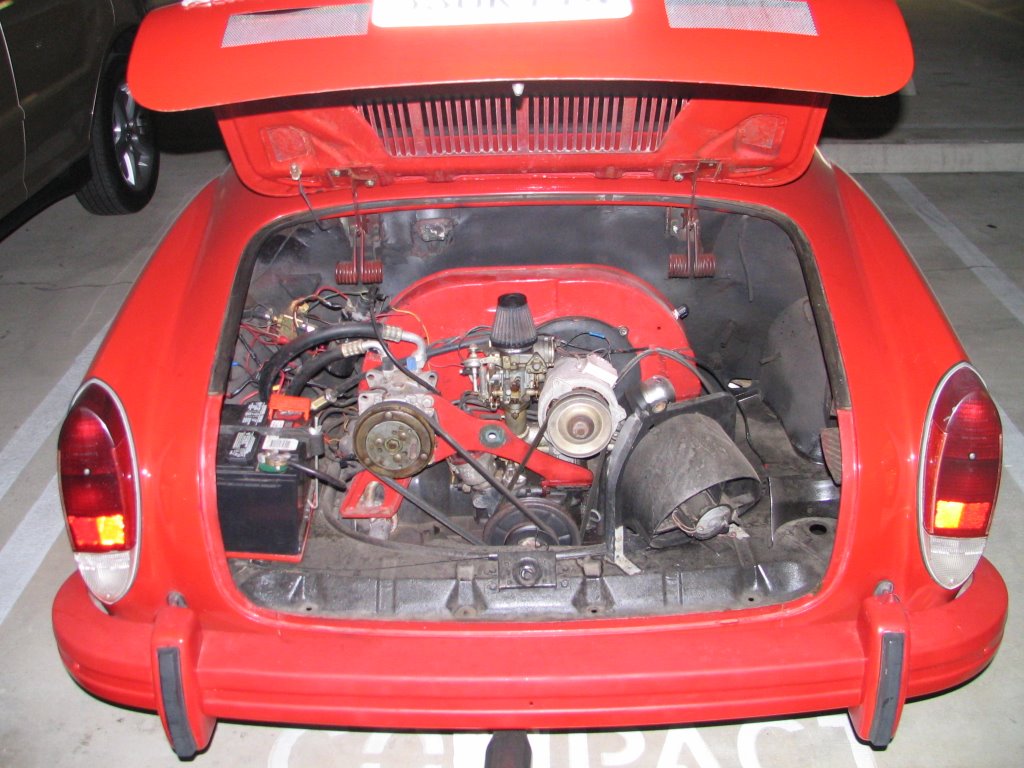
[1600cc ICE Pre-Removal, Aug 15, 2006]

EV political statement,

US dependance on foreign oil, while good for our current economy, is eroding our superpower status. Therefore, mainstream Republican and Democrat patriots should support Electric Vechicles (EVs). My conspiracy theory is that Hybrid, Hydrogen, and Bio-Fuel (HHB) technologies are really supported by a lobbying empire bigger than "Big Oil." The Defense Industrial Complex, Big Oil, and Automotive Industry (D.O.A.) empire is solidly behind HHB technology. However, they all stand to lose big if the 100% electric car (EV) is adopted as The American Car. This hypothesis makes sense if you think about the primary (direct sales), secondary (parts & maintenance), and tertiary (fuel transport) markets that underlie these technologies. Lets face it, dependance on foreign oil is actually good for the profits of the DOA. Dependance has and will continue to create wars [or the threat of war], which lands defense contracts that create jobs. That explains the defense industry. Internal Combustion Engine (ICE) technology, while archaic and inefficient, creates millions of jobs. It is likely that alternatives to ICE do not exist, because they are quickly and silently crushed by the DOA. EV-1 was literally crushed by General Motors (GM) and it is likely that a DOA-style organization was behind the action. EVs are a threat because they are simple and use no petroleum based fuel. With a good design, an EV could go many years without maintenance.

A new economy is coming and it will be the pure electric car. But not before the HHB stalling tactic drags out oil consumption for another 50 years. That is unless garage innovation catches up and presents a better option than HHB and ICE. Pack life, speed control cost, and motor reliability are good places to start.